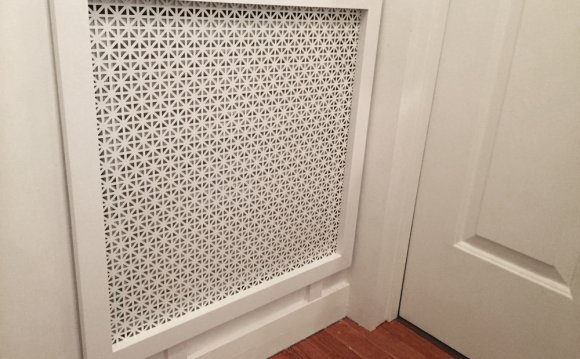
 Well, it took a while to get here…one brilliant idea, a DIY fail, a Plan B that never got off the ground, and then a return to the original design…but I’m finished! FINALLY! And I’m pretty darn excited about how my custom made air return vent cover turned out! See for yourself (and please disregard the door. I still haven’t decided what I’m going to do with the door. Keep it? Replace it? I’m unsure. Oh, and the very messy and ungrouted floor. Yes, I tend to do things a little backwards sometimes.)
But here it is, the new vent cover…
So what do you think?! Wait! Before you answer that, let me remind you what this looked like before this little transformation…
Ewwwwww!!! So gross!! A little flooding, some messy floor painting, and 35+ years of age on that vent (during which it clearly never once saw a fresh coat of paint) had really wreaked havoc on this area. But now everything is fresh, new, and updated!
And the cost of my new vent cover? About $12.50. Not too bad! Heck, if I could have found a new metal one that would have fit (and trust me, I’ve looked and looked), it would have cost about $20.
So do you want to see how I made my new vent cover? Here are the details…
Tools & Supplies:
- 2 pre-primed MDF boards measuring 1″ x 2″ x 8 feet;
- 1 square dowel rod measuring 1/4″ x 1/4″ x 36″;
- 8 wood yard sticks (you might need more or less depending on the size of your vent);
- Wood glue;
- Wood filler;
- Caulk;
- Primer;
- Paint;
- Paint brush(es);
- Miter saw;
- Electric sander with 150-grit sandpaper;
- 150-grit sandpaper for manual sanding;
- 220-grit sandpaper for manual sanding;
- Framing square;
- Brad nailer with 1.5″ brads;
- At least four “C” clamps.
 Instructions:
First, take the two MDF boards and glue them back to back. Use the “C” clamps to keep them perfectly aligned and set them aside to dry completely.
Next, take the wood yard sticks…
…and use and electric sander to remove all of the markings from one side of the yard stick. This is actually imprinted into the wood, so sand until all of the markings are all gone, and then sand a bit more just to be really sure all of the imprints are gone.
Next use a miter saw to cut the MDF boards into the four lengths for the frame of your vent. Miter the ends at a 45-degree angle. Be sure to cut them long enough so that the frame of the vent won’t cover any portion of the air return vent.
With the pieces cut, use a framing square to dry fit the pieces to be sure they’ll all line up square on the corners.
If everything lines up, then use wood glue and a brad nailer to attach the pieces. Use two brads from the side, and two brads from the bottom on all four corners. When all four pieces are connected, set the frame aside to dry completely. Use the framing square to be really sure it’s perfectly square, and then leave it alone (resist the urge to touch it, pick it up, or mess with it in any way) until it’s completely dry.
While the frame is drying, take the square dowel rod, and cut the support pieces for the slats of the vent. You’ll need two pieces per slat. Each pieces should be about 3/4″ long.

You can adjust the angle to the angle you want for your slats. I didn’t want a severe angle because I didn’t want to take a chance at all at blocking the air flow, so I found that this 31.62 angle was idea for my design. (What the heck is that angle used for, anyway? It must be important to warrant it’s very own marking on my saw! But 31.62 sounds very odd, and very precise, doesn’t it?)
Edit: LOL…Okay, as I was reading back over these instructions, I realize that I DIDN’T use the 31.62-degree setting. It’s more like 35 degrees. Gosh…I blame it on being tired. 😀 I’m still really curious about that 31.62-degree marking though. Any thoughts?
If your vent will be more eye-level or higher, you will probably want to use a 45-degree angle and put the slats closer together than I did on my vent.
This was actually the hardest part of the project simply because my saw needs a new blade. I cut probably twice as many pieces as I needed, because my saw would throw the pieces several feet from my work area, and then I’d have to go hunt for them. They also turned out a bit rough looking, but as long as one side had a clean cut angle, they were usable. If you have a new blade on your saw, you shouldn’t have this problem.
Next take your frame (with the thoroughly and completely dry wood glue), and measure and mark the spacing for the slats. For my own vent, I marked 1/2-inch down from the top, and then every 1.5 inches after that. As I mentioned above, if your vent will be eye-level or higher, you will probably want to place your slats closer together.
Now use wood glue to place the little dowel pieces at each mark on both sides of the vent frame. Be sure to press the pieces firmly to the frame so that they don’t “float” on the wood glue and shift. (Just an FYI, this is the back of the vent cover.)
Cut a small piece of leftover yard stick to use as a guide to ensure that the pieces are positioned flush with the frame.
When all of the pieces are in place on both sides of the frame, leave it to dry completely.
When all of the pieces are thoroughly and completely dry, flip the frame over and place it on a completely flat work surface. I used a scrap piece of plywood.
Place a bead of wood glue on the end of a slat (on the back side of the slat, of course), and place it on the support pieces. Use pressure on both sides to squeeze out the excess wood glue so that the slat doesn’t “float” on excess wood glue and shift. Repeat this until all of the slats are in place.
With all of the slats in place, shift the vent cover over just a bit to be sure it’s not sitting in any puddles of wood glue (you don’t want to glue your new vent cover to your work surface!!), inspect all of the slats to be sure none of them have shifted, and then leave it to dry completely.
Once it’s dry, the construction is complete! Here’s what it looks like from the back side…
At that point, you can use caulk to fill in any cracks (like where the slats meet the frame) and wood glue and sand paper to fill in any nail holes, spaces in the mitered corners, etc. Then prime, paint, and attach!
Since my vent is floor level, I didn’t use any type of screws to hold the vent in place. It’s actually quite a perfectly snug fit underneath the ledge on the HVAC closet, so I’m not even sure if I’m going to add any additional attachments.


Share this Post
latest post
-
 Universal Condenser Fan Motor June 30, 2023
 -
 Root Cellar Temperature June 30, 2023
 -
 Residential Heating And Cooling Systems June 30, 2023
 -
 Damp Basement Floor Solution June 30, 2023
 -
 Furnace Return Air Ducts June 16, 2023
 -
 Return air Grille May 22, 2023
 -
 Damp Proofing membrane Manufacturers May 17, 2023
 -
 Crawl space ventilation formula May 12, 2023
 -
 Wood cold air return covers May 7, 2023