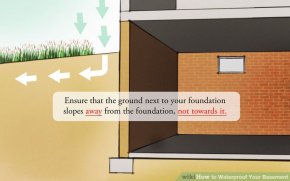
 Evaluate the perimeter of your house. You must ensure that the ground next to your foundation slopes away from the foundation, not towards it. Backfilled dirt around the foundation will typically settle lower than the surrounding dirt causing the ground to sink in and slope towards your house. If necessary, add dirt up against the foundation to create at least a 2" per foot (that is, a drop of 2" for each foot you move away) slope against the foundation. Make sure that the top of the dirt is at least six inches below the sill plate so that there is no ground contact which may cause certain building materials to rot in the future.
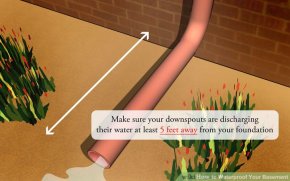
on the ground right next to your foundation, you'll have problems. Make sure your gutters are clean, and make sure your downspouts are discharging their water at least 5 feet (1.5 m) away from your foundation.
Watch out for shrubs and other plants that are too close to your foundation. Rotted roots can create a path for surface water to flow down to your foundation. You should keep plantings at least 12" away from the foundation, and on a slight slope to direct water away from your foundation.
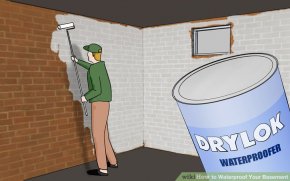
 Try to waterproof your walls with a product such as Drylok or Xypex if you have minor, intermittent leaks. Drylok is a waterproofer not a water sealer. It expands as it dries to become part of the wall. Xypex is more like applying a waterproof concrete on the surface that will bond with it. Because Xypex relies on the presence of moisture to form its waterproof crystalline structure, if a Xypex application does have small areas of water leakage they will seal themselves as they cycle through moisture. Xypex is also 2-4 times as expensive as Drylok. The problem with these solutions is that groundwater which is underneath your basement floor or at the bottom of the walls is under significant pressure, due to the weight of groundwater above it pressing down.
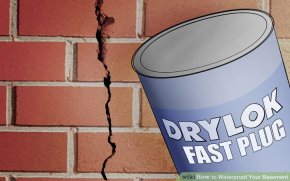
 Repair defects in poured concrete walls such as cracks and the places where pipes and form tie rods go all the way through the concrete. If you see a crack in a concrete wall it goes all the way through the wall to the outside and is a potential source of water. For cracks that will not experience any thermal or structural movement, DRYLOK Fast Plug is very effective in sealing cracks in the masonry. Another reliable way to repair a wall crack is with an injection of construction-grade epoxy that penetrates the crack all the way from inside to outside, bottom to top. Generally, an experienced crack repair technician is the best choice for this. Do-it-yourself kits of epoxy and polyurethane systems are available, but are less reliable.
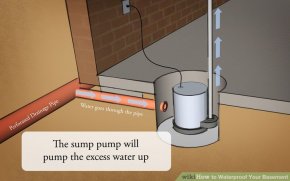
 Consider installing a sump. This is essentially a hole in your basement floor which contains a pump. When the water level in the sump rises too high, a pump kicks on and draws the water out of the sump, discharging it outside the house, 10 or more feet from the foundation. Installing a sump requires a moderate degree of skill and experience, since you will be jack hammering or otherwise creating a hole in the concrete floor of your basement, excavating a hole, placing a liner in the hole, wiring the sump pump itself, and plumbing an outlet from the pump to the outdoors.
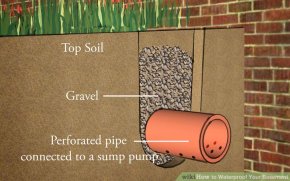
Try a French drain (or perimeter drain) for serious water issues. A French drain consists of a continuous system of piping, running beneath the floor of the basement and along the entire perimeter of the basement. Installing a French drain is similar to installing a sump, but requires cutting and removing an approximately 12" wide strip of basement floor along the entire perimeter of the basement, digging a 12" deep trench, filling it with coarse gravel surrounding the drain pipe, then re-pouring a concrete floor to cover it all up. A French drain will always include a sump and pump for removing any water which gets into the drain system.
Have an installer inject Hydroclay around of your foundation. Hydroclay is a waterproofing version of Bentonite Clay, known for its ability to absorb large amounts of water. Usually pumped from the outside, the clay fills in voids and follows the pathways water uses to get inside your foundation permanently sealing the basement. This is the same product used to waterproof tunnels, manholes, dumps, backyard ponds, elevator pits, etc.
Share this Post
latest post
-
 Universal Condenser Fan Motor June 30, 2023
 -
 Root Cellar Temperature June 30, 2023
 -
 Residential Heating And Cooling Systems June 30, 2023
 -
 Damp Basement Floor Solution June 30, 2023
 -
 Furnace Return Air Ducts June 16, 2023
 -
 Return air Grille May 22, 2023
 -
 Damp Proofing membrane Manufacturers May 17, 2023
 -
 Crawl space ventilation formula May 12, 2023
 -
 Wood cold air return covers May 7, 2023