The three crucial things to consider when building a root cellar are ventilation, temperature, and humidity. Make sure your root cellar is well ventilated. Pears, Tomatoes, and Apples produce ethylene and should be stored close to ventilation and away from other vegetables, especially carrots and potatoes. The more densely packed your root cellar is, the more ventilation you will need. Wrap vegetables with strong smells such as garlic, cabbages, and turnips in newspaper.
The temperature of a root cellar should stay above 32 and below 50 degrees Fahrenheit. The average shelf life for vegetables stored in a root cellar varies from 1-6 months. Make sure you invest in a good thermometer, which displays temperature in your root cellar.
The level of humidity in a root cellar is the third critical piece of your root cellar design. The majority of root crop vegetables store best in high humidity, at about 90-95%. A root cellar with a dirt or gravel floor will retain more moisture than one with a concrete floor. Use a hygrometer to monitor the humidity levels. You can increase the humidity in your root cellar by hanging damp burlap bags over certain crops or by placing pans of water on the floor of the cellar. For root cellars where maintaining high humidity is an issue, pack your root vegetables in sand, damp sawdust or even moss to reduce evaporation.
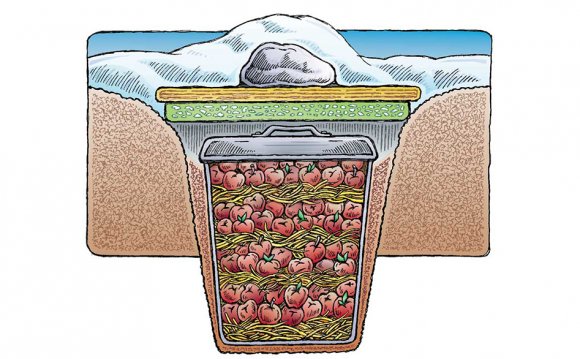
Using a Garbage Can
Take a plastic or galvanized steel garbage can and punch holes in the bottom of it so any water that gets inside can drain out. Pick a spot to bury the can. Layer your vegetables into the can, use wire racks if you can so they aren’t touching one another, wrap them in newspaper, or bury them in layers of sand. Put the lid on tight and cover with a bale of straw or some other marker.
Using an old refrigerator or freezer
You can use an old broken freezer or refrigerator as a mini root cellar. Get an old one from a friend, relative, or even from an appliance store or the dump. Make sure that the Freon gas inside has been safely removed so it doesn’t leak into the air or contaminate your food.
- Dig a hole to bury the freezer at least three to four feet deep so you are below the frost level. If you have one available or can afford to rent one, use a backhoe to make digging easier.
- Create a level layer of large rocks or ¾ inch gravel in the spot where the unit will sit to increase air flow.
- Remove all the mechanical parts from the unit and then punch holes into the backside. You want the holes to be flat against the ground when the unit is buried so the warm air from the ground comes into the unit to keep your produce from freezing.
- You will then punch holes on the top of the unit and the bottom and insert elbows and then straight pipes into each hole. This allows the air that comes in from the ground to be pulled out to the surface. The pipes need to be long enough that they will stick out of the ground once the fridge or freezer has been buried.
- Cover the top of each pipe with a vent to keep water and dirt from falling down into the pipes.
- Use boards to create a box around the fridge so you can bury the fridge but won’t be knocking dirt inside every time you open it. Fill in the dirt around the box.
- Cut a piece of insulation to fit over the top of the unit for extra protection in the winter. If your climate experiences extremely low temperatures, invest in a light that turns on when temperatures drop. A simple halogen light will provide enough heat to keep things from freezing.
- If there is ANY chance, however slim, that children could get into the fridge to play hide and seek, make sure that you take this into account and add safety measures to prevent a tragedy.
Monitor your temperature regularly to ensure nothing freezes or becomes too warm. For an example of how to build a root cellar from an old refrigerator and create an upright root cellar into a hill, see this video:
In Your Garage
If your garage is insulated and you live in the colder climates, you can use old coolers or even heavy cardboard boxes to store your produce through the winter. Before storing any produce, make sure that any fruit or vegetables that have blemishes or soft spots have been removed.
If you are using boxes, elevate them as high as you can on racks to make it harder for rodents to get into. If you use coolers, leave the drainage spigot open or shut the lid but don’t seal it so that there is sufficient ventilation.
Check often for any signs of rotting and to ensure temperature is staying consistent, especially when weather is extremely hot or extremely cold outside.
In Your Basement
Depending on where you live, you may be able to simply store your vegetables in your basement on wire racks or even on one side of the stairway going down into your basement and keep them at a steady temperature. The key is to make sure your temperature and humidity stay consistent at the levels needed for your vegetables and that you have adequate ventilation.
This video shows how to turn an existing old basement room into a great cold storage area, all you need to add is proper ventilation pipes, a thermometer, hygrometer, and to cover that window to keep the direct sunlight off your vegetables:
If you want to get even fancier, you can create a cold room in your basement like this one that even has its own thermostat and ceiling fan:
Using Cob and Earth Bags
Cob is a type of natural building material that is typically made by mixing straw with clay and crushed rock or sand. You can build blocks using “earth bags” which are typically bags of natural woven material such as feed bags or rice bags. You then use the cob to cover the bags to create a smooth finish.
Similar to how you would build a home from earth bags and cob, you can build a root cellar pretty inexpensively as demonstrated in this video:
Spring House
Our ancestors who were homesteaders knew that building their homes near running water such as creeks and streams was beneficial not only for drinking water and cleaning but also for keeping things cool by submerging them in water or storing them in shelves inside the naturally cooler structure.
A spring house can be a free standing structure built over a natural spring, or next to a creek or stream. Ideally it is built into a hill so that at least some of the walls can be made of cool earth. If you cannot build into a hill, you can use brick, block, or stone for the walls.
Things that need very cool temperatures can be kept submerged in airtight containers in the water (milk, butter, etc.) and other items that just need cooler temperatures can be kept on shelves inside the structure. Springhouses can become very damp so monitoring humidity levels and balancing those will be important for many vegetables.
Using a new concrete septic tank
You can use a new concrete septic tank to make a nice sized root cellar. It’s okay if the tank is chipped or cracked so try to get a deal on one that can’t be used for septic because of a defect. You don’t need the fittings or filter so ask for those to be removed. More common sizes are 1, 000 and 1, 200 gallon tanks but one that is 1, 500 or more will pay off by providing you more storage space as well as increased headroom for moving about.
Share this Post
latest post
-
 Universal Condenser Fan Motor June 30, 2023
 -
 Root Cellar Temperature June 30, 2023
 -
 Residential Heating And Cooling Systems June 30, 2023
 -
 Damp Basement Floor Solution June 30, 2023
 -
 Furnace Return Air Ducts June 16, 2023
 -
 Return air Grille May 22, 2023
 -
 Damp Proofing membrane Manufacturers May 17, 2023
 -
 Crawl space ventilation formula May 12, 2023
 -
 Wood cold air return covers May 7, 2023