 We have a wood stove in our sitting-room and normally get snug there on a winter’s evening, with the rest of the house often unheated. But the floor has been noticeably cold – it’s a typical old terraced house with suspended wooden floors above about half a metre of space, ventilated by the air-bricks around the house. So our warm sitting-room has been separated from cold outside air by just the carpet and floorboards.
Anne Cooper of AC Architects recommended this as our next big job to improve our home’s energy efficiency and Alex & Howard Rice inspired us to do it ourselves.
So we’ve just insulated under our sitting-room floor - a significant DIY project. Even if you prefer to have a professional do it, some of this information should still be useful.
Choices
First we took a look under some easy-to-lift floorboards to see into one bay:A big choice was whether to lift the floorboards and insulate from above or to wriggle into this space and do it from below. We decided to insulate the sitting-room from above, but Anne insulated some our hall from below at the far end of this bay. Our sitting-room is divided into 4 bays, separated by “sleeper walls”. A local builder makes holes in them to crawl from bay to bay, but this sounded beyond our competence. As our sitting room has a carpet and not very good floorboards boards, we preferred to lift them. Experts should be able to lift floorboards and replace them still looking beautiful.
In favour of lifting the floor:
Poor floorboards Less worried about appearance- carpetTight, obstructed under-floor space
Other under-floor work: electrics, rot
In favour of insulating from underneath:
Good access under floor from cellar, etc Beautiful, bare floorboards Tongue & groove boards – harder to take upWillingness to work in tight spaces
English Heritage has a guide discussing this, especially relevant to old buildings. If you need to lift a suspended timber floor for other reasons, then definitely insulate under it.
We wanted a high standard of insulation after doing all this work. For new-build, current building regulations specify a U-value of 0.25W/m2K. By chance our proposed solution, using 200mm of glass fibre matches this, helped by having some insulation under the joists. Heat-loss through the joists is significant, especially when they are close-spaced like ours, occupying 16% of our floor area.
Because of this, 100mm of Celotex between our joists would give a worse U-value for us (0.39W/m2K), even though Celotex is a much better insulator than glass-fibre. See Thermal Calculations Online. We could have used Rockwool (mineral wool) or Sheep’s wool (more expensive), instead of fibre-glass.
Your floor and situation will be different - we hope this information helps your choices:
1. Taking up the floorboards
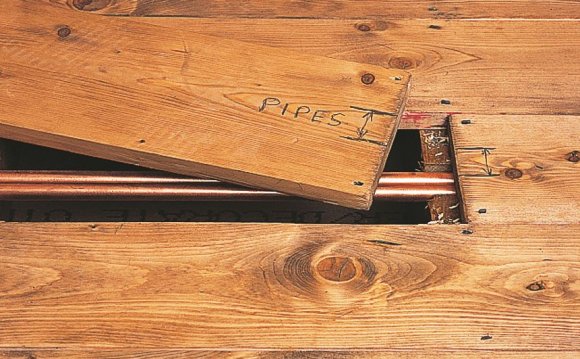
We managed without removing any skirting boards. But every floorboard needs cutting above the middle of a joist for a place to begin lifting it (unless it’s been lifted before). If your floorboards are tongue and grooved, like ours, you also need to saw between them to cut the tongue and be able to lift them. We did this with a power jig-saw, tilting the saw to avoid cutting the joists or to start a new cut. Beware of cutting any cables or pipes!
 This let us do a pretty neat job, except for a few places where the blade hit a nail. But it’s worth using new sawblades for this job, because they cut much quicker than old ones!
Before you start lifting boards, label every separate piece of floorboard so you can put them back in the right place. We found that this double-headed lifting bar was a wonderfully satisfying tool for prising up the sections of floorboard, but an old tyre lever and wrecking bar were useful for a few awkward boards in the corners. If the boards are stiff, it helps to loosen the nails to waggle the boards a bit, either waggling up and down with the lifting bar, or by waggling the board side to side (if its stuck under the skirting board for example). Hammering down on board above the nails can also help. We also borrowed a special nail puller which was excellent for pulling the nails out of the joists once we’d lifted the boards.
We left the boards that were alongside the skirting board because it would have been difficult to have lifted them without taking off the skirting board, but this didn’t seem to matter- it was quite easy to push the insulation and polythene film underneath.
When removing nails from lifted floorboards, hammer their tip with the board resting on a scrap of wood until the nail head is clear. This reduces splintering of the floorboard’s good side. Save cut nails for re-use, straightening them by hammering against a paving slab.
2. Preparations: fixing the netting, etc
While your floorboards are up, it’s an ideal time to: • Find and fix any other problems, like rot - we had to! • Add extra electrical outlets • Remove any unused cables or pipes and label those in use • Insulate any hot pipes• Leave a time capsule for people to discover many decades hence.
Ideally pipes and cables will sit below the insulation, but it can be fitted around pipes. Cables should only pass through insulation for half a metre: more and they can overheat.
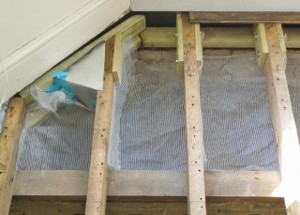
If the room has external walls with airbricks to ventilate under the floor, make sure they are clear and have good airways to under the insulation. You probably need to make ducts from the airbricks to below the insulation. We used thin aluminium.
Garden netting is normally used to hold fibrous insulation between the joists, but as we wanted to insulate under the joists too, we chose “Thermacrop”, a tough netting sold as a garden fleece. Compared to open netting it should help keep draughts out of the insulation, while still being porous to water vapour, which is essential. After cutting it into strips the width of the bay, we glued folds to hang off each joist, to prevent gaps between each pocket (see drawing). Normal hot-melt glue melts Thermacrop, but Cool-melt glue, as used in schools, etc works fine: mark it where you need to glue and align the 2 layers over some newspaper. Squirt glue along the line and press it down quickly with another strip of newspaper. This squeezes the glue through the 2 Thermacrop layers, bonding them together. Fix these folds at the right height on each joist with stainless steel staples (avoiding the possibility of rust!) At the ends of the bays, depending on the position of the last joist, you may need battens screwed to the wall to staple the netting to.
3. Adding insulation - with variations
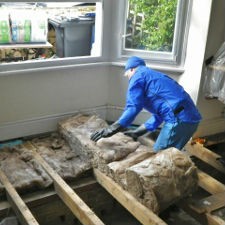
We used nearly 3 rolls of 200mm thick glass fibre, which was £13 a large roll from B&Q, thanks to the CERT subsidy for DIY use (which will expire in December 2012). Buy it quick!
Saw the glass-fibre rolls, without unwrapping them, into the width of the net pockets. Lay it roughly in place and cut it to length with scissors. Tear a strip off the edge of the glass-fibre where the joist will be and arrange it to fill the pocket, fluffing it up to reach floorboard level.
We also used one small roll of homeECO Insulation, made from recycled PET bottles: unlike glass-fibre, it can be handled without itches and so is good for filling tricky gaps or insulating from below the floorboards. It’s extremely hard to saw widths from the roll, but otherwise is easy to handle and to tear into appropriate strips.
Share this Post
latest post
-
 Universal Condenser Fan Motor June 30, 2023
 -
 Root Cellar Temperature June 30, 2023
 -
 Residential Heating And Cooling Systems June 30, 2023
 -
 Damp Basement Floor Solution June 30, 2023
 -
 Furnace Return Air Ducts June 16, 2023
 -
 Return air Grille May 22, 2023
 -
 Damp Proofing membrane Manufacturers May 17, 2023
 -
 Crawl space ventilation formula May 12, 2023
 -
 Wood cold air return covers May 7, 2023